tl;dr
- With Polygon CDK, chains can design and deploy a custom native token for gas, bringing better user and dev experience
- Chain sovereignty in the AggLayer puts no limitations on how chains establish governance tokens
- Follow along with the walkthrough to implement a custom native gas token on a Polygon CDK-built chain
Peel back the paradigm of aggregated blockchains, and you’ll find a few core tenets:
- A multichain ecosystem that shares state and liquidity is a positive sum proposition;
- Scale means any arbitrary number of new chains can join this unified environment—the AggLayer—whether these chains are recently launched as a Layer 2 or if they are existing chains that connect; and
- All chains in the multichain ecosystem must retain full sovereignty over how key aspects of their respective networks are run—including the option to deploy custom native gas tokens.
The idea of “custom native gas tokens” is quite simple. Developers can design chains such that a custom native token for the chain itself is used for gas or for governance—or both.
It’s so simple, in fact, that with Polygon CDK, a collection of open-source software that makes it easy for developers to spin up new chains or migrate existing chains to the AggLayer, you can learn how to launch a custom native gas token in the tutorial below.
As more chains choose to deploy with Polygon CDK and connect to the AggLayer (the first chain joined in March 2024!), more chains will enable custom native gas tokens.
In this post, we dive into why builders using Polygon CDK may choose to launch a token for gas or governance, the ease with which they’re able to do so, and provide a walkthrough for trying yourself.
Watch the walkthrough here:
Why would a chain connected to the AggLayer use custom tokens for gas?
In simple terms, native gas tokens can be a meaningful way for protocols to assert more sovereignty.
Whether custom native tokens are used to incentivize a decentralized network of validators or sequencers, or used to program onchain governance, Polygon CDK enables chains to design gas tokens that can bring multiple types of utility.
So what does this mean in context of the AggLayer?
The answer is: Whatever the chains decide! With the AggLayer, the name of the game is sovereignty, unified.
Custom native gas is a chain-dependent choice. There are no governance requirements imposed on chains by the AggLayer, so networks can design tokens to represent their community’s collective will.
While some connected chains may choose for gas to be paid in ETH—like Polygon zkEVM currently does—this won’t be a required choice.
And for the AggLayer, it also doesn’t matter. While the AggLayer post proofs of the aggregated chain states back to Ethereum using ETH, sovereign CDK chains nevertheless may choose to bootstrap community and governance with gas tokens of their choice.
For existing chains joining the AggLayer, this is crucial: The native token already used to pay transaction fees on the network can remain intact, even as these existing networks sync into a broader, unified web of chains.
A walkthrough for spinning up custom native tokens
The following is a walkthrough for setting up a test CDK chain that uses a custom token. You can follow along below, or check out the original documentation in GitHub, from which this guide takes most of its language.
Begin by installing the kurtosis package. Use this tool to quickly run Polygon CDK deployments locally for testing.
Then open a terminal or command line and clone the repo to your local environment:
git clone https://github.com/0xPolygon/kurtosis-cdk
Once completed, navigate to the directory
cd kurtosis-cdk
You will now have all the files needed locally to create a new CDK. In order to try the gas token out in your local environment, edit the params.yml file and set zkevm_use_gas_token_contract to true.
When you make this change, a couple things will happen:
- During contract deployment, an ERC20 token will be deployed on L1
- The rollup creation parameters will be modified to set the gasTokenAddress to the address of the L1 ERC20
After setting the zkevm_use_gas_token_contract, you are set up to run Kurtosis to deploy a new CDK with a native gas token.
kurtosis run --enclave cdk-v1 --args-file params.yml .
This will take a few minutes, as the full set of contracts will be compiled and deployed. When finished, you should see the full set of services that were deployed.
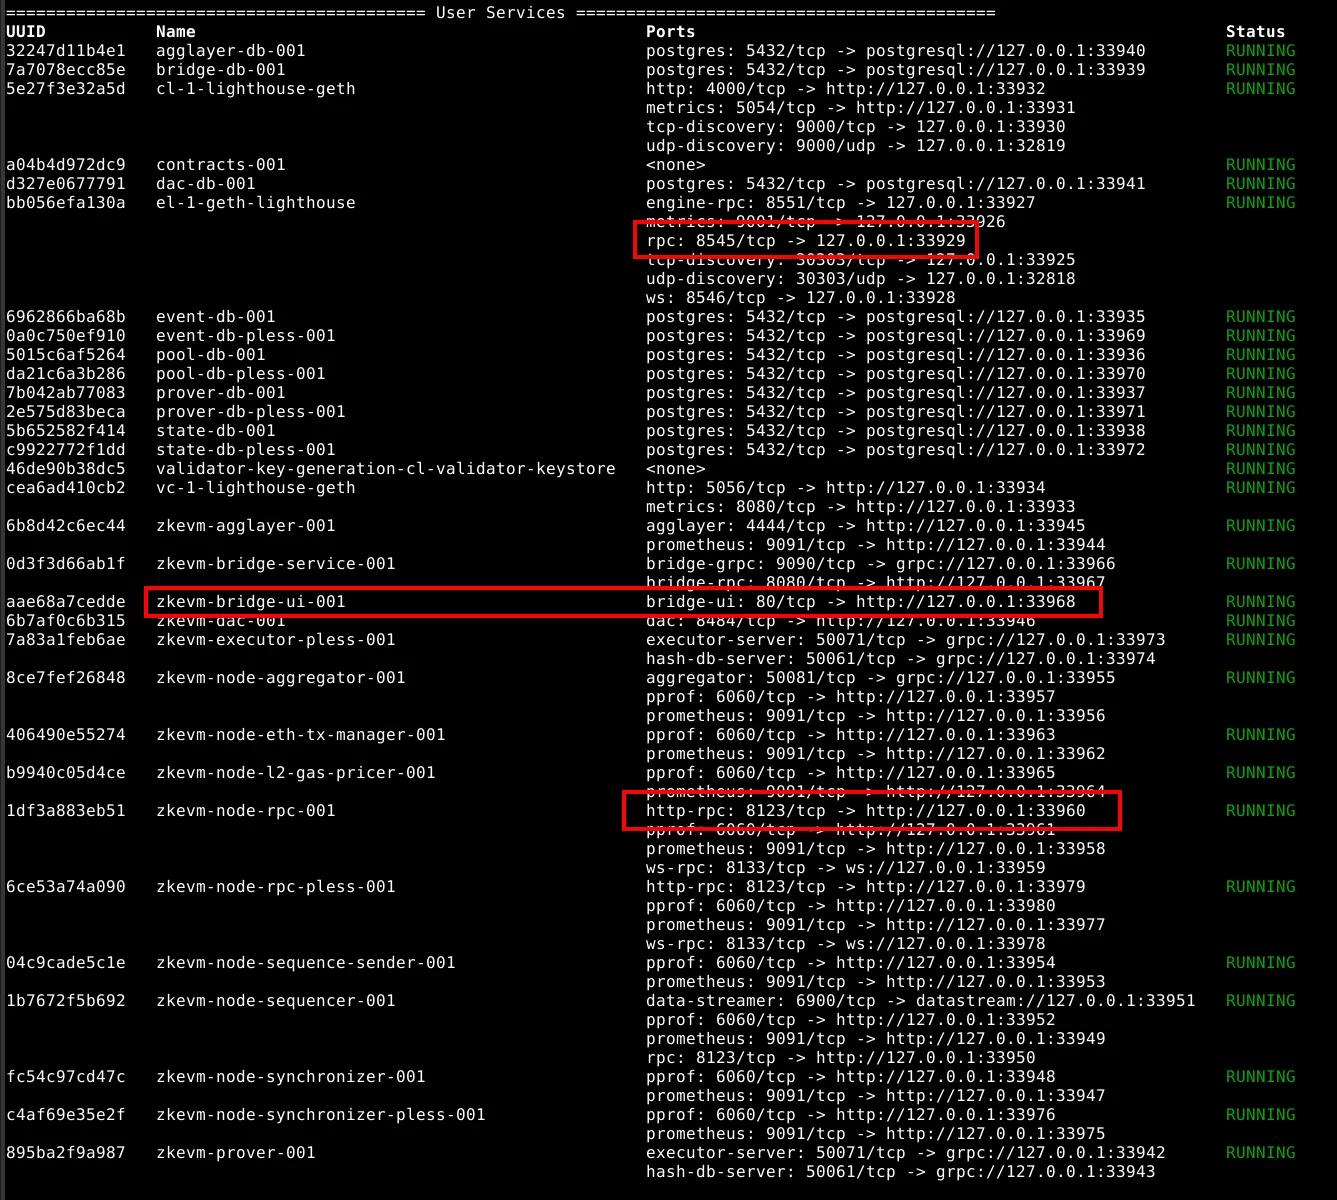
For the rest of this guide, the focus will be on three of these mapped services: the bridge UI, the L1 RPC, and the L2 RPC.
To get started, extract the generated files and take a look at the gasTokenAddress
kurtosis service exec cdk-v1 contracts-001 "cat /opt/zkevm/create_rollup_parameters.json"
Running this command will give the address of the ERC20 token.
In order to bridge, one should mint some of this token. Running this command requires you to have the Foundry toolchain installed.
cast send \
--mnemonic "code code code code code code code code code code code quality" \
--rpc-url "$(kurtosis port print cdk-v1 el-1-geth-lighthouse rpc)" \
"$(jq -r '.gasTokenAddress' /tmp/zkevm/create_rollup_parameters.json)" \
'mint(address,uint256)' \
0x85dA99c8a7C2C95964c8EfD687E95E632Fc533D6 1000000000000000000000000000
If successful, you can check the token balance, as well:
cast call \
--rpc-url "$(kurtosis port print cdk-v1 el-1-geth-lighthouse rpc)" \
"$(jq -r '.gasTokenAddress' /tmp/zkevm/create_rollup_parameters.json)" \
'balanceOf(address)(uint256)' \
0x85dA99c8a7C2C95964c8EfD687E95E632Fc533D6
Now that you have some L1 gas tokens, open up the bridge UI. You’ll need to open your browser to the address of the bridge UI service. Run this command to get the URL easily, and then open the URL in your browser.
kurtosis port print cdk-v1 zkevm-bridge-ui-001 bridge-ui
You’ll need to add RPCs for L1 and L2 to your browser wallet. Because the URLs are using HTTP instead of HTTPS, you’ll need to add the RPCs manually to Metamask. The URL for the L1 and L2 RPCs can be retrieved with these commands:
kurtosis port print cdk-v1 el-1-geth-lighthouse rpc
kurtosis port print cdk-v1 zkevm-node-rpc-001 http-rpc
Additionally, if you used the mnemonic code...quality, you’ll also want to import an account using a private key.
The first derived private key from the code...quality mnemonic is 42b6e34dc21598a807dc19d7784c71b2a7a01f6480dc6f58258f78e539f1a1fa.
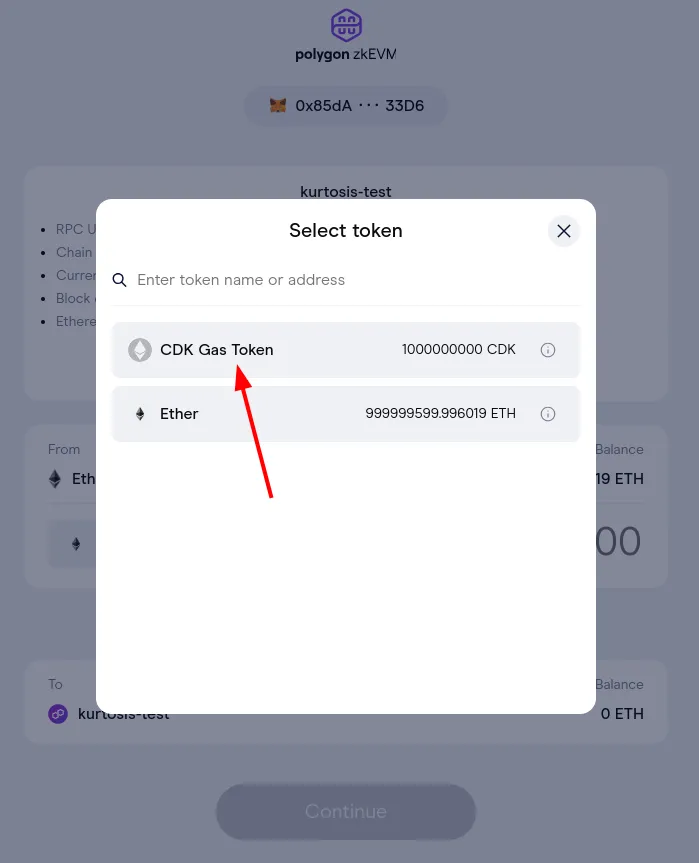
Now you’ll need to add the gas token to the bridge interface and attempt to bridge.
First, you’ll need to click the token dropdown menu:

In the modal, you’ll want to paste the ERC-20 gas token address that you found earlier, with this command:
cat /tmp/zkevm/create_rollup_parameters.json | jq '.gasTokenAddress'
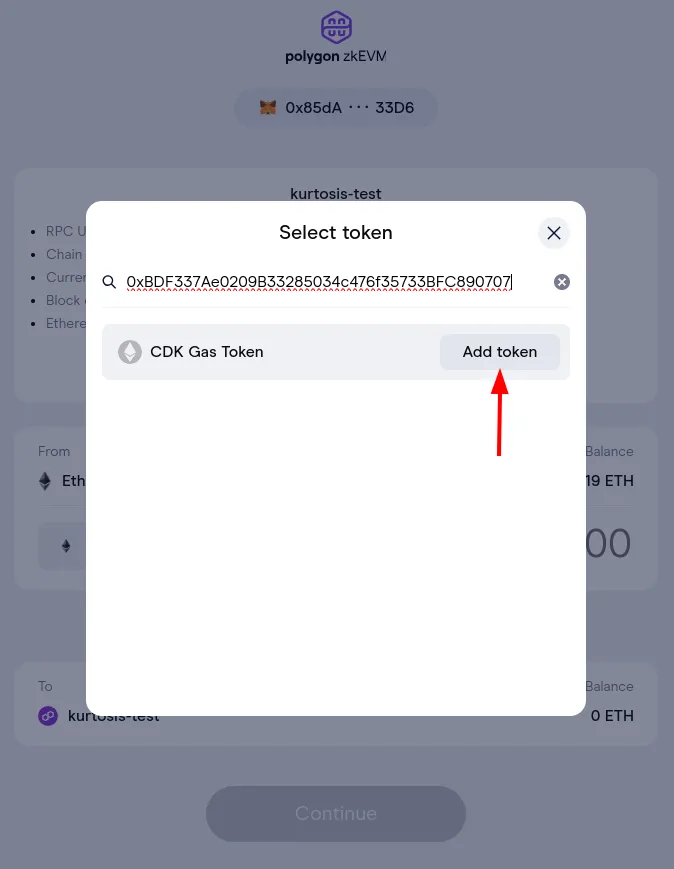
Confirm the details of your token and then click the add button.

Now that the token has been added, you’ll need to select the token for bridging.
At this point, you should be set to make the bridge.
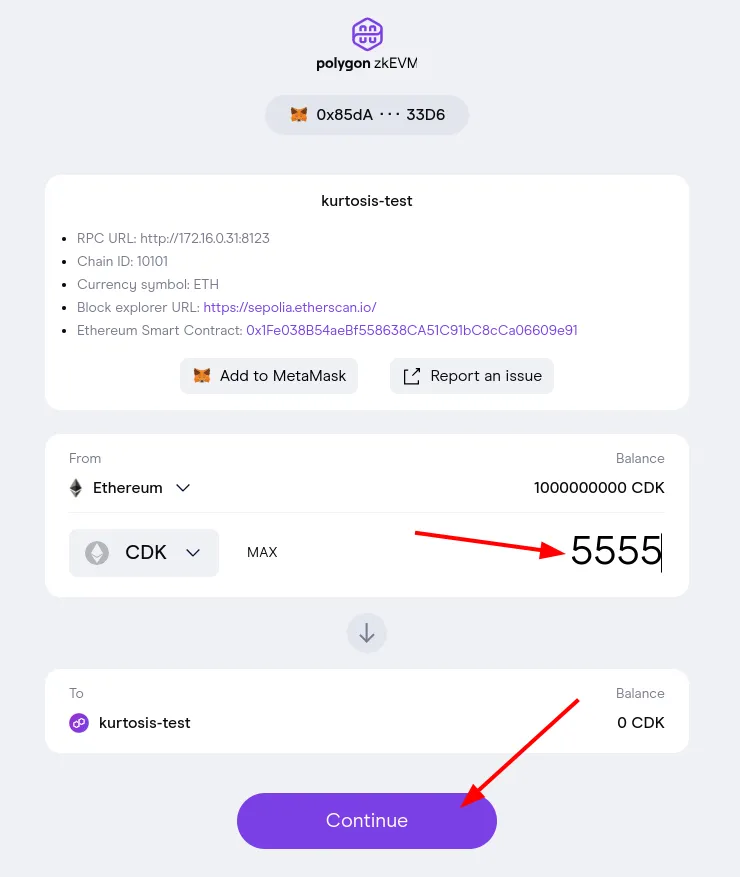
Now your bridge deposit should be pending.

After some time, your transaction should show as claimed.
If it doesn’t, it’s possible the autoclaiming service on L2 is not funded. You should be able to send it some ETH on L2 by running a command like this:
cast send --legacy \
--value 10ether \
--private-key 0x12d7de8621a77640c9241b2595ba78ce443d05e94090365ab3bb5e19df82c625 \
--rpc-url "$(kurtosis port print cdk-v1 zkevm-node-rpc-001 http-rpc)" \
0x5f5dB0D4D58310F53713eF4Df80ba6717868A9f8

At this point, if you switch Metamask to your L2 network, you should see the bridge value as native value on L2.

And there you have it! With little friction, you deployed a native gas token for a Polygon CDK chain.
What’s next?
Want to get a better sense of how devs can easily spin up a chain with Polygon CDK and design a custom native gas token?
Read through the Knowledge Layer docs for in-depth tutorials and a better understanding of how simple Polygon CDK makes it to launch a chain.
Tune into the blog and our social channels to keep up with updates about the Polygon ecosystem.
The future of Web3 is aggregated.
Website | Twitter | Forum | Telegram | Discord | Instagram | LinkedIn | Polygon Knowledge Layer

.webp)
.png)